Hot(ish) Peppers and Cutworms

20130725-075433.jpg

I recently harvested some hot-ish peppers from my garden. Jalapeño peppers we use often. I bought a rather established plant from the local nursery out here so no surprise the plant has begun producing. But the Greek pepperoncini I got as a tiny little starter and about three or four weeks into it a cutworm sabotaged it. I propped it up with a stake and hoped for the best, but secretly I thought it was a goner. So I’m thrilled to see it producing now! But…what to do with them? I haven’t quite figured that out yet. Vinegar will likely be involved.

Advertisement

Drying Herbs

20130703-184427.jpg
We are having a blistering heat wave here in Portland. It is an extremely unusual time for it. Of course we had a friend visiting for the worst of it so Portland kind of let me down in that respect. With good friends though none of that matters. The best day was the day we stayed in, so thank you, heat, for that.

With this heat I had to be really diligent about watering things. And of course I was dumb and planted new things anyway. So far everything, new and old, seems to be holding up well. I have been eyeing my herbs though. I hate losing herbs simply because I got lazy about them, but truthfully everything else comes first.

Today though, I thought about how much better my own herbs would be in the winter, not to mention the money I’d save, and I decided to get out there and clip some things. The parsley I prefer fresh so those will go in the fridge for using soon. The chives I might freeze in olive oil and then keep in the freezer. The thyme and oregano though I plan to hang dry.

The key to drying herbs is, after washing them, make sure they are completely dry before hanging them in a well ventilated place. I tie them firmly to allow for shrinkage as they dry but I don’t tie them so tight that I pull moisture from them and mold builds up. You could take the time to clear the tying area of leaves but I’m lazy that seems wasteful.

Then those bright happy bunches will look kind of sad when they finally dry.

20130703-184523.jpg
But they will be packed full of flavor when you add them to your savory fall and winter soups, stews, pot pies, empanadas…

Stuffed Mushrooms (GF and Dairy Free)

mushrooms

We have decided to try to eat vegan once a week (more if possible) so last night for dinner I made a mess of stuffed mushrooms for dinner.

Stuffed mushrooms typically have breadcrumbs in them and there are a lot of ways to handle this if you are gluten free. I’ve taken corn-flakes and thrown them into a food processor. This works amazingly well. Sometimes I try a product off the shelf and up until this latest product I haven’t been all that impressed.

Ian’s brand Gluten Free Panko Breadcrumbs are wonderful. Here is the best thing I can say about any gluten free product. You won’t notice a difference from the gluten filled equivalent. This gluten free thing gets easier and easier as it becomes more mainstream. Things have changed dramatically on the grocery shelves and in restaurant-land in the four years I’ve been learning about all of this. It reminds me of when major coffee chains began carrying dairy alternatives nationwide (2000? 2001?). So this is one more welcome change.

Here is roughly how I made these. I say roughly because I really didn’t measure anything so I am guess-timating here.

about a dozen large mushrooms with stems intact (gently remove stems by twisting them out and leaving caps intact – chop stems finely)

1 celery stalk finely diced.

2-3 tablespoons of finely diced onion

about 4 parsley stems with leaves (separate the stems from the leaves and chop each finely – don’t mix them in with each other)

about 4 tablespoons of olive oil

about 1 tablespoon of drained capers

about 1 heaping tablespoon on finely chopped fresh thyme

black pepper to taste

about a 1/4 cup of Ian’s gluten free panko breadcrumbs (or breadcrumbs of choice – cornflakes thrown in a food processor will work in a pinch)

about 1/4 cup of low sodium vegetable broth

Heat oven to 400. In a baking dish (I used a pie plate) drop in about 2 tablespoons of oil. use a mushroom cap to spread the oil around the baking dish. Put the rest of the caps in the dish and move around to coat them. You could do all of this in a separate bowl but I hate doing dishes so this is how I do it. You want to thinly coat each mushroom cap and have the dish itself be thinly coated in olive oil. After everything is oiled make sure your mushroom caps are cap side down (so the little well is facing up ready to be filled). Place the caps – for now without a filling – in the oven and roast for 15 minutes. While the caps are roasting…

In a large non-stick skillet add the remaining two tablespoons of olive oil and heat the pan well. When the pan/oil is good and hot toss in the finely chopped mushroom stems and let them sit – stirring very sparingly – until they start to brown. Then add the finely diced celery, onion, and parsley stems and sautee until the onion is softened and starting to appear translucent. Add the capers, the thyme, and breadcrumbs and sautee constantly. This will go very fast and the mixture will quickly look very dry. This is when you will begin adding the broth. You want to add enough broth that the breadcrumbs are moist, but not mushy/soggy so go easy on the broth and add it slowly (you may end up adding less than a 1/4 or maybe slightly more). Once the desired consistency is met turn off the heat stir in the parsley leaves and add pepper to taste. I don’t add salt to this recipe because we are not huge fans of salt in our food and I feel that the capers are just enough salt for this dish. But taste the stuffing at this point and adjust things to your taste.

After the fifteen minutes are up for the first roasting of the mushroom caps take them out of the oven and set them down on a heat-proof surface. With a spoon fill each cap with the stuffing mixture until it is evenly distributed. I had a little more than I needed but I ended up just eating those two spoonfuls (yum). Place the pan back in the oven and roast for 10 more minutes. Serve them piping hot from the oven immediately.

These are so good and they don’t contain things that you often find in stuffed mushrooms – thinks like cheese, garlic, or bacon. You really won’t miss them. The fresh thyme (from my garden!) really adds this wonderful flavor, and the texture of the celery and onion along with the saltiness of the capers and the freshness of the parsley (also from my garden!) makes this a nice late-spring dish. In Oregon we are still having cool nights so turning the oven on is not something we need to avoid yet.

Unplanned Food Preservation Day

001
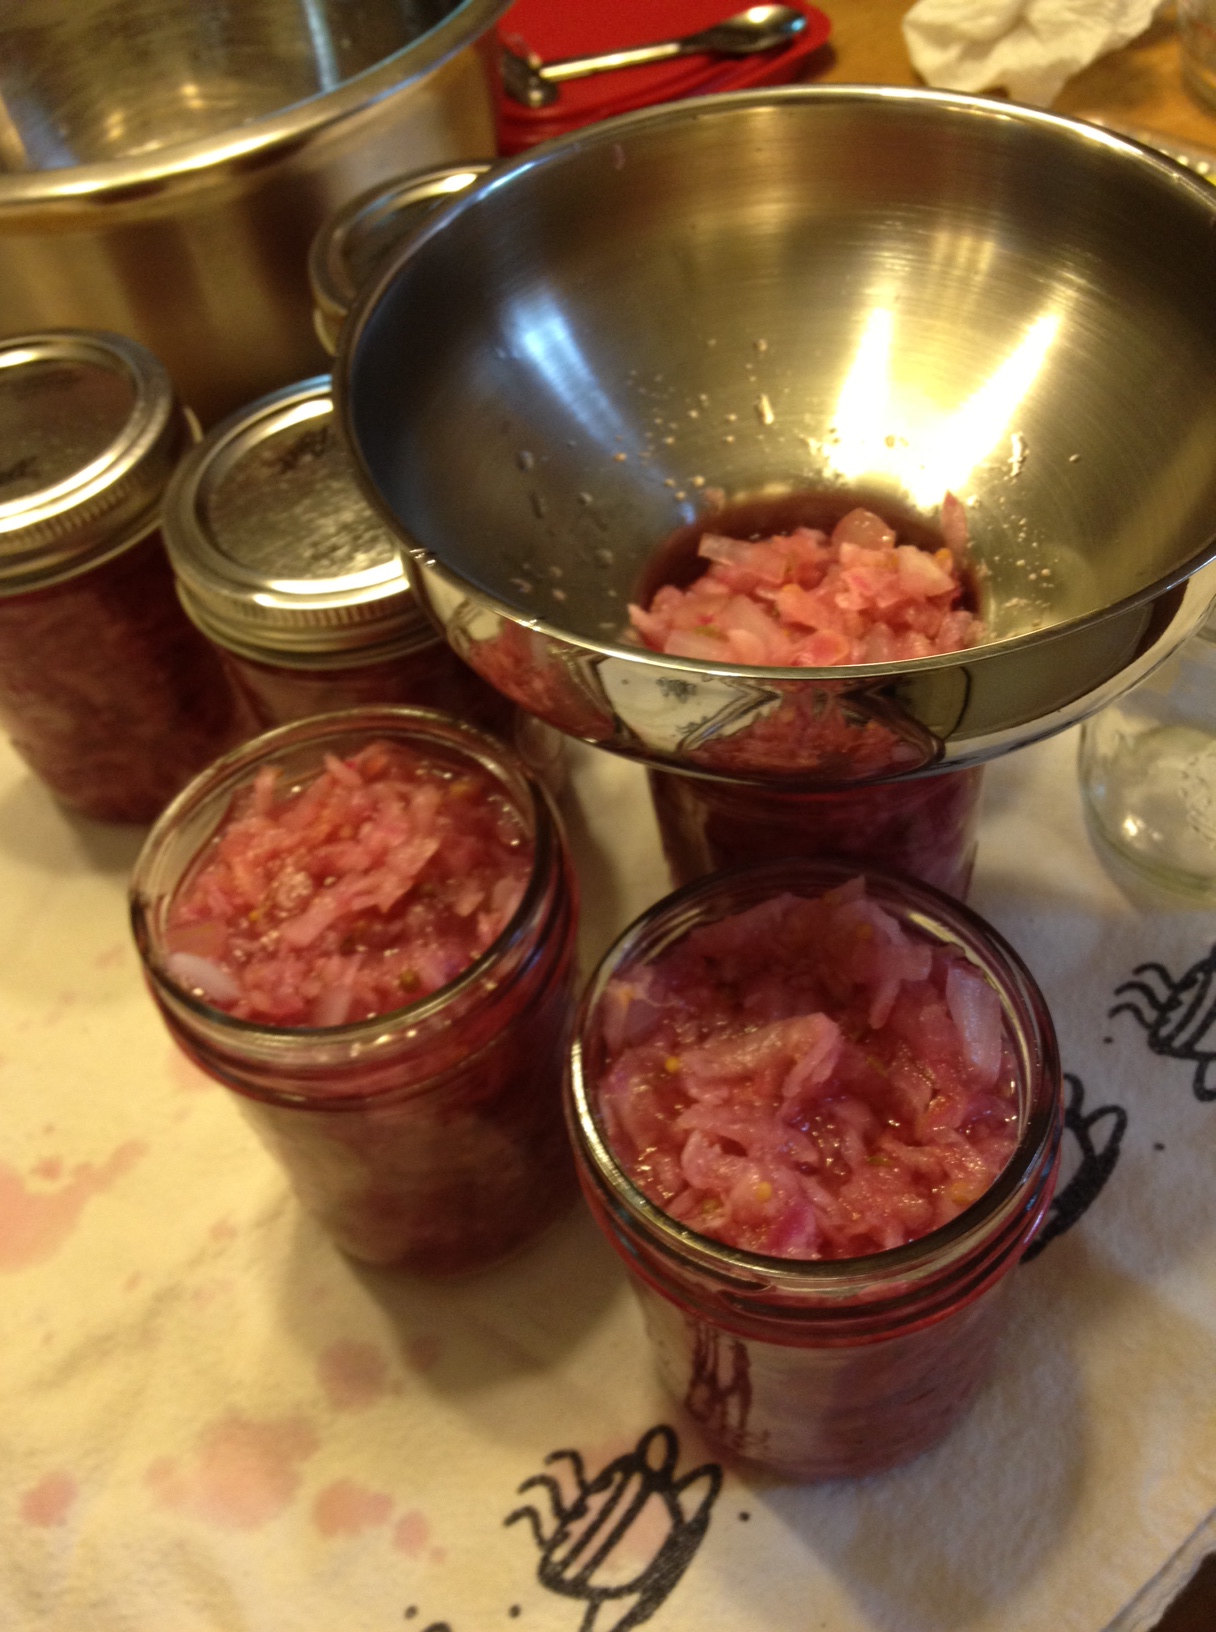
Oh, y’all. Oh, my. Food preservation can become a full time job. I am almost dreading tomato season…

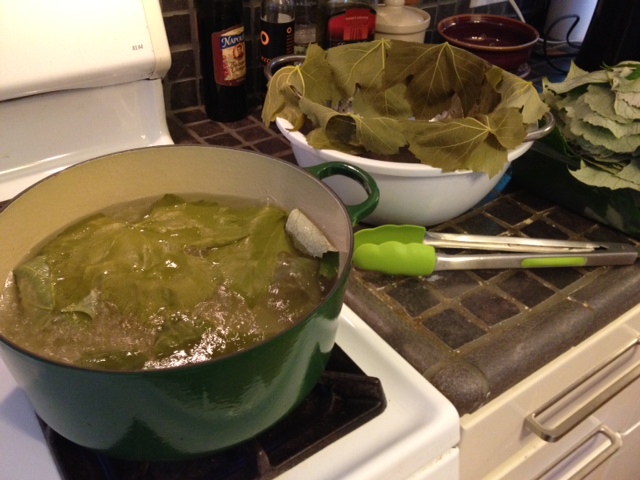
We asked for some help last weekend with heavy weeding and some clean-up/fixing of the last ugly spot in our yard which is the side yard by the composter that leads out to the area we store our trash can, recycle bin, and city compost bin. It is a horrible spot we haven’t devoted a lot of time to, and it is also a very muddy area of the house because the neighbor’s gutters are basically draining over to our side of things in that spot. We had a path there that was never great to begin with because of tree-root issues and a lot of mud slung itself over everything. Add in that it is a favorite spot for the dogs to dig holes, and that the previous owners had bolted a set of open shelves to the side of the house and it finally rotted and basically broke and fell apart, but somehow still clung tenaciously and somewhat drunkenly to the siding, and you had one hideous disaster of a side yard. Well! Heidi and Laurel (all of our yard helpers are women – girl power!) made short work of it. There is a pile of debris which will be hauled off soon, the path has been pulled up in spots and some pea-gravel has been raked smooth (update! dogs already dug two holes but it still looks better than it ever has), the ground has been leveled off significantly, and the weeds have been ruthlessly yanked out. The other thing they did was trim our Concord grape vines so you don’t get smacked in the face as you walk by. I asked them not to put the vines in the compost bin because I wanted to harvest the leaves so I could make dolmas (stuffed grape leaves) with them later. I clipped a bunch of leaves and brought them into the house…but then realized I would have to deal with them sooner rather than later because leaves really don’t store well for any length of time. They just dry out and become brittle, brown, and unusable. So I ended up spending a lot of time cleaning, blanching, and trimming them so that I could get them in the freezer. It ended up kicking off a food preservation afternoon and I’m not going to lie. I was pretty exhausted afterwards.

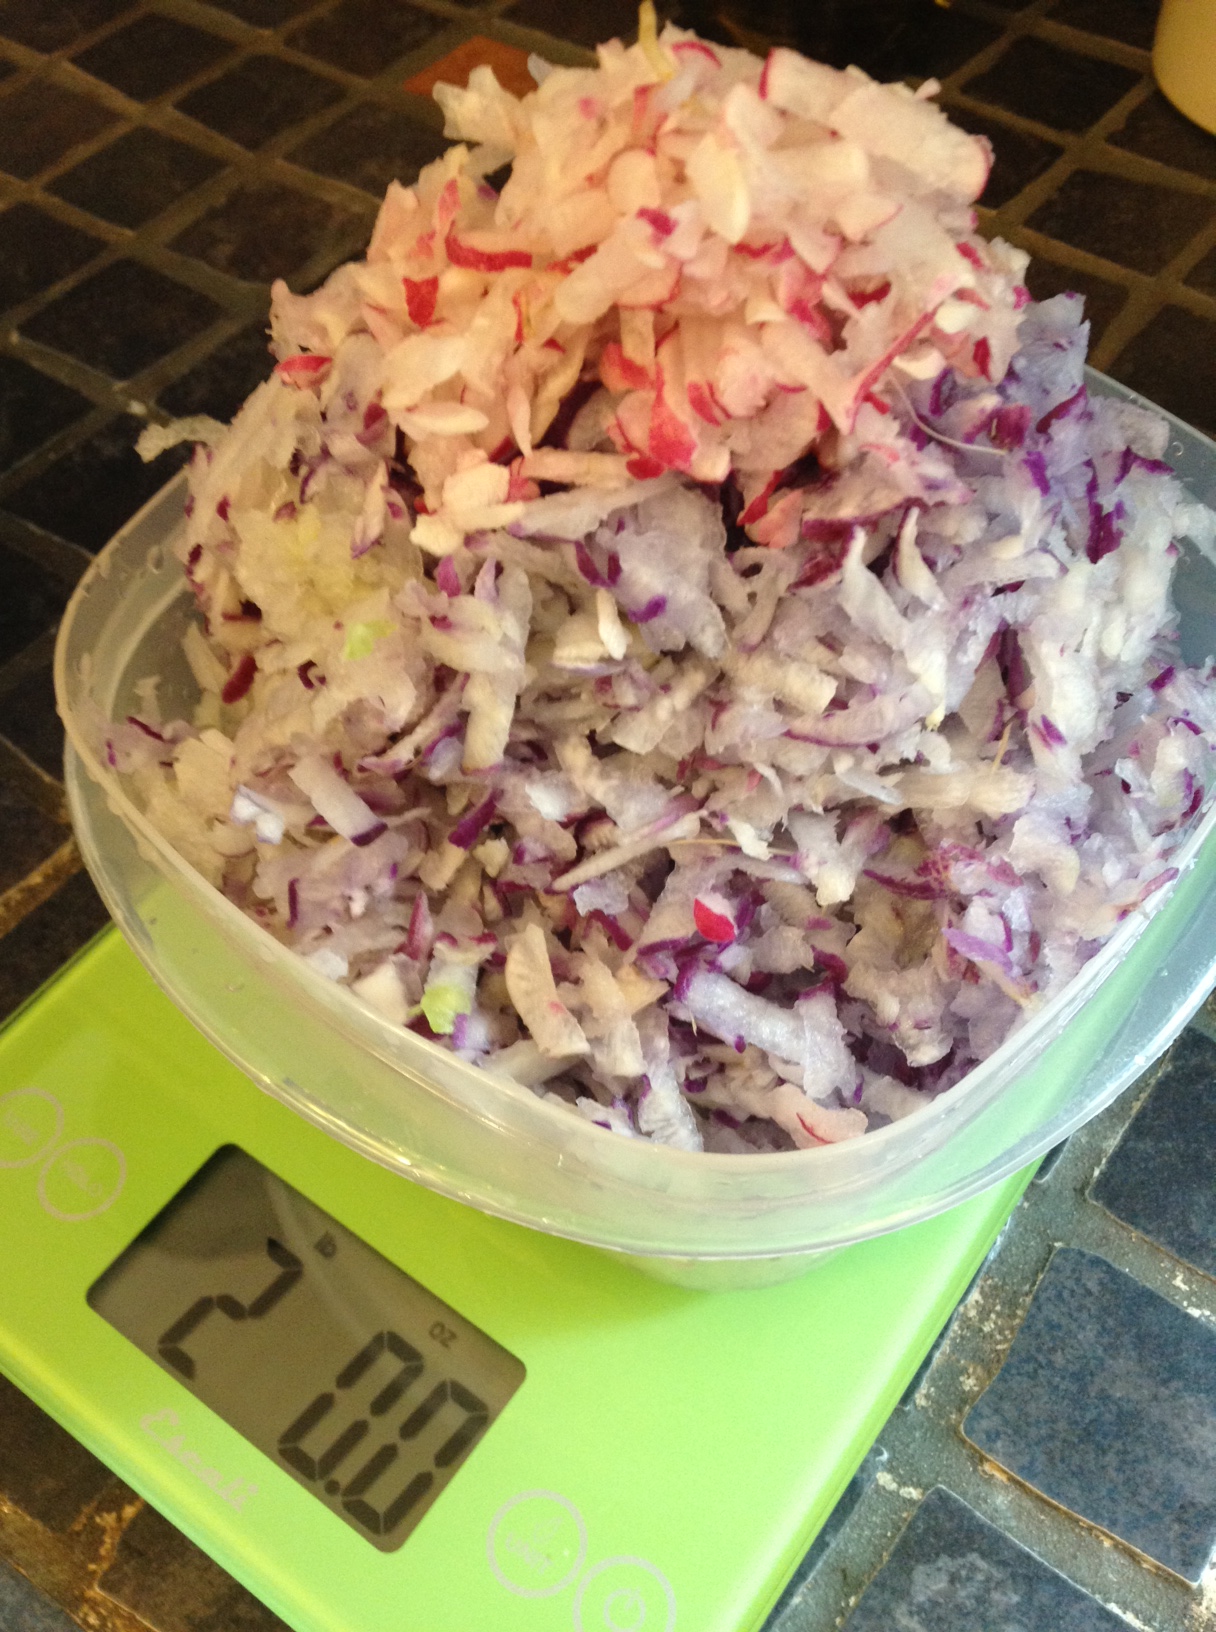
After dealing with the 110 grape leaves* I decided to harvest my escarole because it was starting to reach a point where it was going to spoil out there. So I harvested, cleaned, chopped, blanched, and froze that. Then I spent time harvesting strawberries, by far the least labor intensive thing of the day. I washed and hulled them, then froze them on a tray. Once they were frozen solid I slipped them into a plastic bag. Since I plan to use the berries in some kind of canning project (jam or preserves) I was careful to measure exactly how many pounds I had before freezing them. I was very excited to have two pounds on my hands! One more pound and I’ll be in jam/preserve making business. Next up (soon) will be to harvest beets and purple snow peas. I’ve already decided to preserve the beets, however we will be eating the greens right away. Turns out greens preservation is not my favorite thing. The snow peas… I’m not sure. We might eat them quickly, but I might freeze them for a stir fry later. Depends on what life throws our way…

Blanching grape leaves.

image

Trimming grape leaves.

trim

110 Grape leaves blanched, blotted dry, stems trimmed, and stacked in neat piles by size.

image_3

Harvested escarole.

image_5

Blanching chopped escarole.

image_6

Drying escarole.

image_7

Neat little bags of escarole ready to go into the freezer which will eventually make its way into some soup this winter.

image_9

Weighing strawberries. Two pounds!

berries

Laying out (washed and hulled) strawberries on a pizza pan to freeze. After the berries freeze transfer them to a freezer bag and label.

image_11

And of course I need to give credit to my trusty kitchen helpers!

image_4

* Sorry no pictures of how I froze the grape leaves! After blanching and trimming the grape leaves I separated them by size. Then I rolled them up tight;y, like a cigar, in stacks of about a dozen. Then I wrap each “cigar” tightly in plastic wrap. I then place the plastic wrapped “cigars” into a freezer bag, push out as much air as I can before sealing it, label it, and finally tuck it into the freezer. There is nothing like using fresh grape leaves for dolmas. They are so much more tender and tasty than the ones you buy that are packed in brine. It was a huge pain in the butt to do, but it is so very worth it! At some point in the future I will post my dolmas recipe which is very simple (olive oil, onion, fresh dill, lemon juice, and a bit of salt) and also gluten free, and vegan.

First time canning solo! Radish Relish.

image_5Monday was our relaxation day this weekend. I decided it was a good day to take a deep breath and do some canning. I’ve canned things before (once I made strawberry rhubarb jam with a friend and last year for my birthday my sister signed us up for a quick canning course at Sur La Table in California), but I’ve never done it by myself. This year I decided I was really going to try to preserve as much as I could from our garden and that means home canning. I have been nervous about doing it on my own, but my first harvest-able crop was at risk of spoiling because I have been putting it off due to nerves. So I took a deep breath and just did it. I am happy to report it seems to have been a success. All seven jars of the radish relish that I made popped and I was ridiculously thrilled. The relish contains: 2 pounds or grated radishes, 2 inches of fresh grated ginger, 1 cup of onions, 2 cups of white distilled vinegar 5% acidity, 1 and 1/2 cups of sugar, 1 tblsp kosher salt, 1 tblsp yellow mustard seed, 1tblsp cumin seed, and 1 tblsp coriander seed. It was really such a thrill to hear and see those pretty little jars filled with pinkish goodness “pop” and I can’t wait to taste this on a grilled hot dog or sausage. The recipe, and instructions for canning, came from the book “Put ‘Em Up!: A Comprehensive Home Preserving Guide for the Creative Cook, from Drying and Freezing to Canning and Pickling,” by Sherri Brooks Vinton.

Weighing radishes on my new scale – 2 pounds exactly!

image

The relish boiling on the stove.

image_1

The set up on the stove – the relish boiling next to the canning pot.

image_2

Ladling the relish into jars using the canning funnel.

image_4

Putting the lids on the jars – the final steps before putting the jars in the boiling water to process (thanks Mike, for taking this one!).

image_3

All seven popped and cooling on the counter.

image_6

Gardening & The Yard

This is a cheap post in which I post pictures of what our yard looks like. This is the best it has looked in the three years we have been living here. I’m growing a lot of food again this year and am going to do my best to preserve it so it doesn’t go to waste. My fruit trees, at year three, are really starting to produce too. It’s all very exciting and a little bit intimidating too. We have seen a little aphid problem on one of our cherry trees which is par for the course. We will be picking up some lady bugs as soon as we can get to the store. We are dedicated to being totally organic!

Green beans are beginning to blossom. We also have chard, tomatoes, and onions growing in this bed. image_1

Two more tomato plants as well as some Basil and a few flowers to bring in bees and butterflies that should bloom mid-summer.

image_2

Four pepper plants – two bells, one ancho, and one pepperocini – as well as some California poppies and some rosemary.

image_3

The view standing at the back of the yard.

image_4

Another shot of some of the vegetable beds. The strawberry bed is the one with the gnome sitting in it. Then we have a bed filled with onions, beets, radishes, lettuce, basil, and escarole. In the background are two beds filled with artichokes, potatoes, rhubarb, cucumbers, and butternut squash.

image_5

The view standing on the back deck.

image_6

A close up of a peach growing on one of our peach trees. You can also see another rosemary plant in the background. In the bed that is hard to see we have basil, cilantro, parsley, Russian sage, oregano, and thyme growing. The bed next to it I have given over to flowers; red poppies and some colorful wildflowers whose name escapes me right now…

image_7

Some pretty flowers growing.

image_8Another angle showing the flowers and our fig and pear trees.

image_9My cute doggies checking out the scene through the fence gate. You can see I like to put out things like wind chimes and colorful garden pottery and ornaments. Soon we hope to have strung fairy lights across the whole yard too.

image_10

A close up of the one (out of three ) purple artichoke plants I planted two years ago. This one is still going strong.

       image

Excavation!

We are having a bunch of work done in our yard by two – sometimes three – amazing women. Our yard is a pretty large size for Southeast Portland and it has really been a challenge for us. We were keeping on top of it for the past two years with help from a friend, but our friend couldn’t help us anymore and we were rather abruptly reminded of how much work it is. Work that we can’t keep up with, not only because we both have horrendous back problems (me with arthritis and weak spots from old injuries, and Mike with a misshapen disc), but also because we are busy people who like to spend our time on more fun things than back-breaking yard work followed up with ice-packs, pain, and ibuprofen. When we bought the house we were gifted with twelve planter beds in the yard. Since I don’t have six kids, and I don’t want to homestead and be canning all the time, this is simply too much for two people. We are pulling out three of them. One of the smaller ones will be turned into a closet shed for tools, and the other two we are giving away to friends. A lot of plants in the beds are actually landscape plants and so in the early fall (any day now!) we will be moving them out of the beds and using them in the landscape which will hopefully help suppress weeds. We are also planning to build an over-sized shed that will become Mike’s glass studio. From a practical standpoint the shed is a good addition to the house since a yard this size, where the house has no garage and no basement, desperately needs one.

In the open area of the yard we have decided to build a labyrinth for meditation, reflection, and just to look at since the curves are beautiful. A big bonus will be that the hard-scaping will keep weeds down (it’s a constant battle here in the urban rainforest). It will be on a smaller scale than what you see at places like St. Grace Cathedral in San Francisco, of course. We are going to go with a more medieval and simplistic design that should suit the house and soothe our hippie souls. The dirt excavation to make room for the gravel and stone has been quite interesting from an anthropological standpoint. Our house is an old farmhouse (circa 1895) and is the legendary hippie house, which is saying something in Southeast Portland. Before we bought the house it had been rented for 15 years or so by up to eight hippies who were, as one neighbor put it, “real laid back.” When they finally decided to all move out the owners moved in, renovated it, and then sold it to us. They were lovely people and we feel grateful to have such a cool house, in an awesome neighborhood, in an amazing city. You can see a little bit of the history of the house in what ends up getting unearthed as we excavate. I find it rather fascinating and a lot more interesting than the usual, and seemingly endless, bits of glass (i.e. broken beer bottles) that have been constantly pushing their way to the surface over the past three years.

This weekend we have nothing more exciting than lots of errands to run to prepare for house guests, who will then turn into house/dog sitters, and the big trip to Europe.